I have figured out why one side of my short rows look wonky all the time!! And it turns out I could have corrected this problem months ago by simply re-reading the directions in the glossary of any number of the knitting books on my shelf.
The problem was...drumroll...I inserted the needle from front to back instead of back to front when hiding the wrap on the purl side.
AFTER I figured this out on my own by fiddling with my knitting for an hour, out of pure spite I looked up the little short row instructions at the back of Interweave Knits, Spring 2009 that I had used to learn how to do purl-side short rows just to say "Ha! You told me how to do it WRONG!!" and I found this little gem: "Purl stitch: On wrong side, work to just before wrapped stitch. Insert needle from back, under wrap from bottom up, and put on left needle. Purl them together" (p.108). *Blush*
So, all is right in the world. Interweave Knits knows what it's talking about, I know how to do the purl side short rows now, and I'm almost done with my Delancey Cardigan (this short row revelation happened while knitting the second sleeve cap).
Incidentally, this brought up an interesting knitting question. I am not a frogger. I know that the first three short rows on the second sleeve aren't perfect, and I also know that the entire back side of the short rows on the first sleeve aren't perfect, but this does not bother me one iota. I always read Ravelry notes about ripping back sleeve caps or shawl collars or cable sections three, four, or five times to get it right...and I always think "Why?" Fellow knitters, do you keep ripping until it's perfect, or just figure it's good enough?
PS I almost entitled this post "I'm still alive!" because I have noticed that any knitting blogger worth her salt has at least one post with that title. *giggle* Anyway, I am still alive and knitting, and although I've been busier than usual lately I do have some things that are just about ready to share!
Post PS I've started again with the DVD sets of Buffy the Vampire Slayer while knitting in the evenings. Bring on the witty banter and handsome, non-sparkly vampires!
Showing posts with label Technique. Show all posts
Showing posts with label Technique. Show all posts
Saturday, November 13, 2010

Tuesday, July 20, 2010
Finished and Christened: The Country Club Cardigan!
I stayed up waaaay past my bedtime on Sunday night to finish the last two rows and the i-cord bind-off, and thus finish the knitting part of my drapy cotton cardigan. Then, yesterday during the kids' nap time, I wove in all the ends, crossed my fingers, and threw it in the washing machine. It doesn't matter how many commercial knits I have washed and dried over the years, I still don't trust it completely with my handknits! Washing this one caused special nailbiting since it was too large to fit in any of my mesh bags. It turned out to be fine, though--and the fabric was even improved.
Before I reveal the final product, however, I want to share a few more things I learned from the project.
1. On the edge of a fabric, M1 increases will cause the edge to roll a lot more than kfab increases will. The rolling doesn't really bother me on this sweater, but I am filing that little tidbit away for future use. Exhibit A, showing the wrong side of the front edge of the cardi (the hem is at the foreground of the photo):

2. On a very long edge, a skinny i-cord edging will not stop the stockinette roll around the bottom of a piece--but a nice hot steamy iron will (provided it's a plant fiber, of course)! Exhibit B, the "after ironing" shot of the hem:

3. Knit Picks Simply Cotton Sport yarn shrinks. A lot. I knew it would--my swatch lost between 10 and 12 percent of the length--but it still surprised me. Why, I don't know...I must have been in denial. Haha. The length from underarm to hem, prewashing/drying, was nearly 20 inches. After? Right about 17 inches. But on the plus side, the yarn also becomes incredibly soft after a trip through the washer and dryer, so overall I think I am in love with this yarn.
4. I don't know why my short rows (which I used to add length to the fronts of the cardigan) look so much worse when I close the holes on the right side than when I do it on the wrong side. Can anyone tell me what my problem is? Exhibit C, short rows with holes closed on the knit side--ugh!:

Exhibit D, short rows with holes closed on the purl side--yay!:

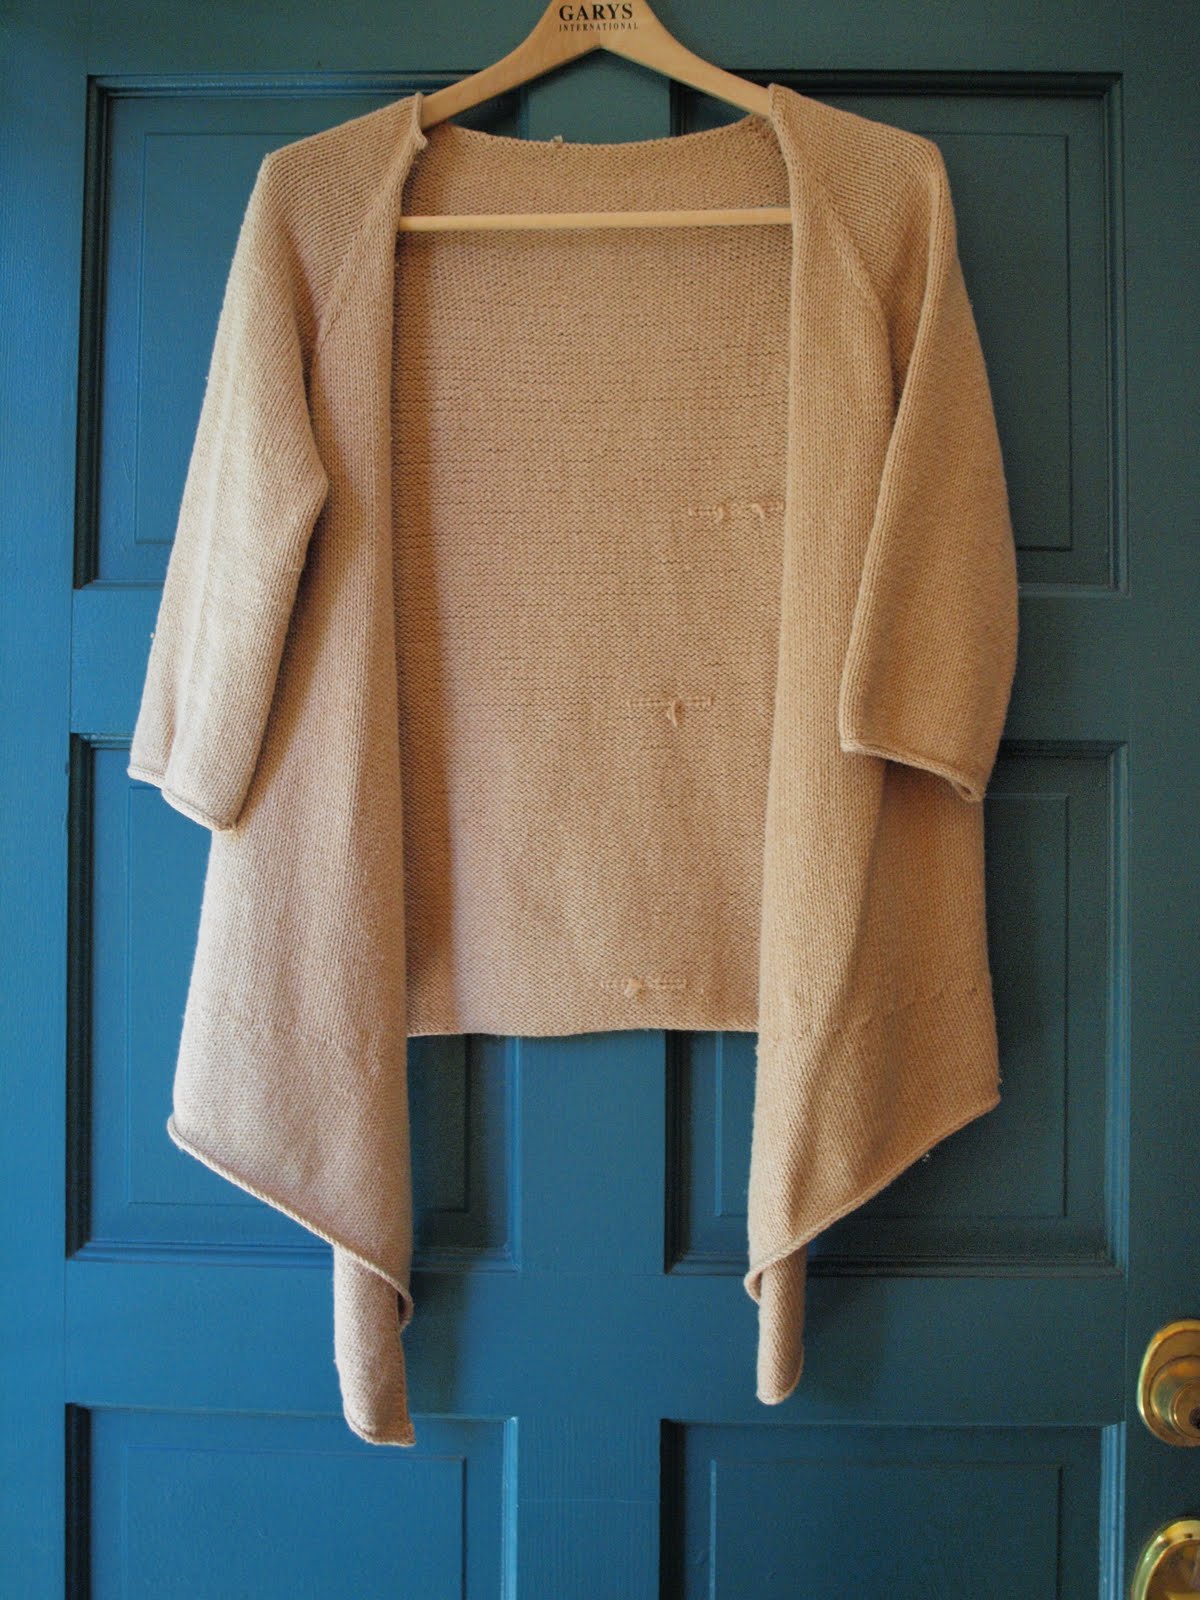
Anyway, this has been quite the learning experience and I feel like I need a drumroll here, or something...here it is! My "Country Club Cardigan," so named because it reminds me of something someone much wealthier than I am might wear as a swimsuit coverup while lounging by the pool and wearing a large-brimmed hat, high wedge sandals, and sunglasses. I'll be wearing it to the grocery store, over my jeans, and with a toddler on my hip!


Before I reveal the final product, however, I want to share a few more things I learned from the project.
1. On the edge of a fabric, M1 increases will cause the edge to roll a lot more than kfab increases will. The rolling doesn't really bother me on this sweater, but I am filing that little tidbit away for future use. Exhibit A, showing the wrong side of the front edge of the cardi (the hem is at the foreground of the photo):

2. On a very long edge, a skinny i-cord edging will not stop the stockinette roll around the bottom of a piece--but a nice hot steamy iron will (provided it's a plant fiber, of course)! Exhibit B, the "after ironing" shot of the hem:

3. Knit Picks Simply Cotton Sport yarn shrinks. A lot. I knew it would--my swatch lost between 10 and 12 percent of the length--but it still surprised me. Why, I don't know...I must have been in denial. Haha. The length from underarm to hem, prewashing/drying, was nearly 20 inches. After? Right about 17 inches. But on the plus side, the yarn also becomes incredibly soft after a trip through the washer and dryer, so overall I think I am in love with this yarn.
4. I don't know why my short rows (which I used to add length to the fronts of the cardigan) look so much worse when I close the holes on the right side than when I do it on the wrong side. Can anyone tell me what my problem is? Exhibit C, short rows with holes closed on the knit side--ugh!:

Exhibit D, short rows with holes closed on the purl side--yay!:

Anyway, this has been quite the learning experience and I feel like I need a drumroll here, or something...here it is! My "Country Club Cardigan," so named because it reminds me of something someone much wealthier than I am might wear as a swimsuit coverup while lounging by the pool and wearing a large-brimmed hat, high wedge sandals, and sunglasses. I'll be wearing it to the grocery store, over my jeans, and with a toddler on my hip!

Tuesday, July 13, 2010
It's all in the details.
I am still going strong on my reverse engineering of the Allegoro Drape Front Cardigan. The miles of stockinette, instead of being boring as I might have feared, are a great canvas for trying out different increases and thinking about how the placement of shaping will effect the finished garment. Since this is my first go at doing a sweater without a written pattern, I have given in to what a favorite professor called "the paralysis of analysis" more than a few times, but overall I am pleased with how it's progressing!
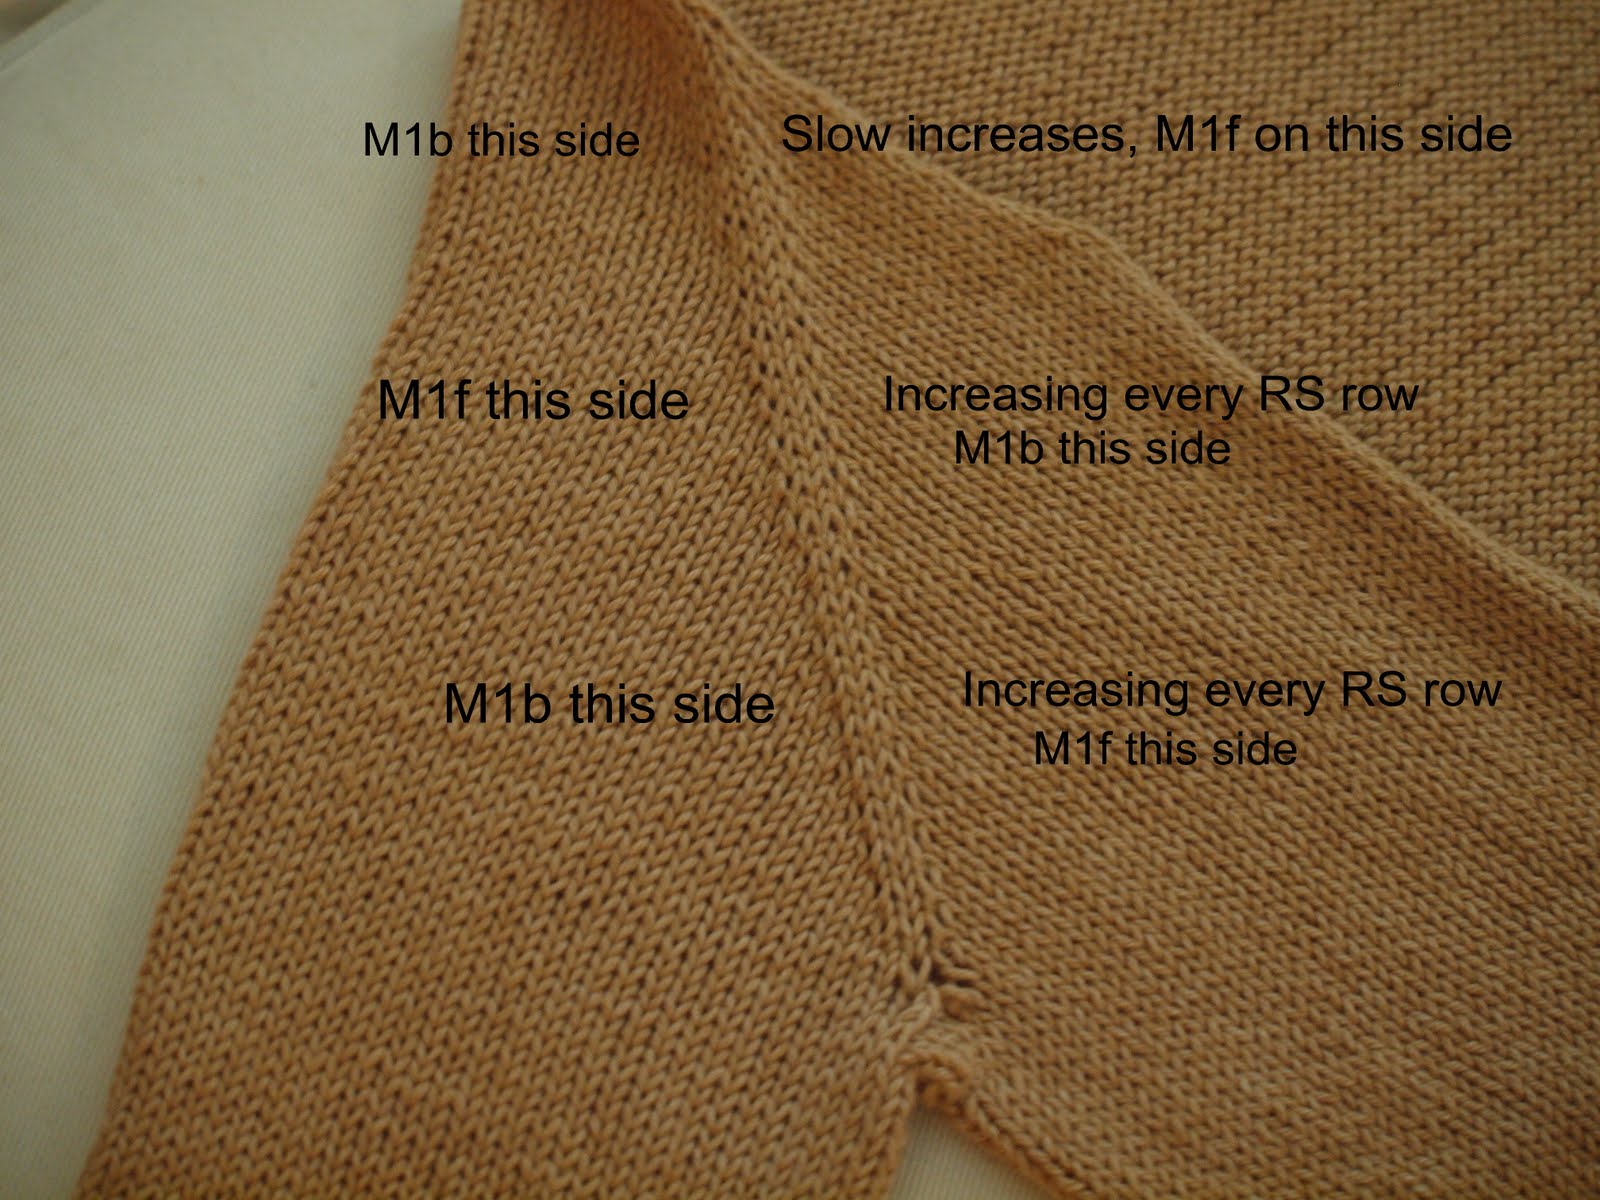
On the raglan increases for a top-down sweater like this, I learned I prefer slower increases, as they are most invisible. (Those increases are shown at the top of the next photo.) I will have to play with the cast on number next time, though, because if I kept going at that rate I would have had armholes halfway down my biceps. My second favorite kind of raglan increases are [M1b, k2, M1f], done every right side row (shown at the bottom of the next photo). I like the way the center stitches raise neatly and the increases recede. I didn't like the middle section of increases I did, which were [M1f, K2, M1b], at all--I thought it looked very messy.

This project has also given me a new obsession: i-cord, both applied i-cord and as a bind off. It looks so nice and neat at the end of a stockinette swath, and as a bonus, it stops the curling that makes my perfectionistic soul cringe. I was also worried that the wide-ish neckline would stretch and refuse to stay on my shoulders if I didn't do something to stabilize it.
The neckline before picking up and knitting a few rows then doing a 2 stitch i-cord bind off:

Neckline after:

It's subtle, I admit, but less so in real life. I will be doing a matching 2 stitch i-cord bind off on the bottom of the sweater as well. I used a 3 stitch i-cord bind off on the sleeve, which is nice, but a little more obvious and I thought it might look a bit too heavy on the drapy parts.

The last few inches of this project will take a long time, I am afraid. The body length is nearing the bottom of my rear end, and the rows are upwards of 300 stitches at this point! I just broke into my seventh skein, and I am estimating that it will take about 8 1/2 total to finish the project--so that gives a rough idea of how close to finishing I am (the next picture was taken about 2 inches ago)! I can't wait to wear this.

On the raglan increases for a top-down sweater like this, I learned I prefer slower increases, as they are most invisible. (Those increases are shown at the top of the next photo.) I will have to play with the cast on number next time, though, because if I kept going at that rate I would have had armholes halfway down my biceps. My second favorite kind of raglan increases are [M1b, k2, M1f], done every right side row (shown at the bottom of the next photo). I like the way the center stitches raise neatly and the increases recede. I didn't like the middle section of increases I did, which were [M1f, K2, M1b], at all--I thought it looked very messy.
This project has also given me a new obsession: i-cord, both applied i-cord and as a bind off. It looks so nice and neat at the end of a stockinette swath, and as a bonus, it stops the curling that makes my perfectionistic soul cringe. I was also worried that the wide-ish neckline would stretch and refuse to stay on my shoulders if I didn't do something to stabilize it.
The neckline before picking up and knitting a few rows then doing a 2 stitch i-cord bind off:

Neckline after:

It's subtle, I admit, but less so in real life. I will be doing a matching 2 stitch i-cord bind off on the bottom of the sweater as well. I used a 3 stitch i-cord bind off on the sleeve, which is nice, but a little more obvious and I thought it might look a bit too heavy on the drapy parts.

The last few inches of this project will take a long time, I am afraid. The body length is nearing the bottom of my rear end, and the rows are upwards of 300 stitches at this point! I just broke into my seventh skein, and I am estimating that it will take about 8 1/2 total to finish the project--so that gives a rough idea of how close to finishing I am (the next picture was taken about 2 inches ago)! I can't wait to wear this.

Saturday, May 22, 2010
Seaming Reverse Stockinette...Or, Finding My Motivation
I have been a busy knitter lately! I finished my second Creature Comforts Cardi, this one for a friend (who promised to send me a picture of her wearing it so I can share!) and decided that my poor Fireside Cardigan had been neglected for far too long. The problem is that I always lose my will to go on once a project is to the point where all that is left is the sleeves, so I decided to do the finishing on the body to kick start my desire to finish the sleeves. I love the coil-less pins to keep things together while I stitch, and I lay the whole thing over my knee to have both hands free for the work.

Mattress stitch is my preferred seaming method because it is so invisible--but I'd never seamed reverse stockinette before, so out came my trusty Reader's Digest Knitter's Handbook by Montse Stanley. It turns out it's not much different from stockinette mattress stitch; you just have to make sure you always catch the bottom of the ridge on one side and the top of the ridge on the other. So as I was working, I was chanting "Bottom, top, bottom, top..."


Mattress stitch is my preferred seaming method because it is so invisible--but I'd never seamed reverse stockinette before, so out came my trusty Reader's Digest Knitter's Handbook by Montse Stanley. It turns out it's not much different from stockinette mattress stitch; you just have to make sure you always catch the bottom of the ridge on one side and the top of the ridge on the other. So as I was working, I was chanting "Bottom, top, bottom, top..."

I think it turned out pretty well...as you can see below, there is a little ridge where the seam is, but I am thinking re-blocking the piece once it's all seamed up will solve that. I still have some ends to weave in and the perfect buttons to find, but it looks like a vest now! And, HUUUUUUGE sigh of relief, it fits. Now to tackle those sleeves.
Subscribe to:
Posts (Atom)