Pages

Saturday, November 27, 2010

I can't believe it...

But the knitting is finished on my Fireside (first blogged here, then again here; Ravelry pattern page here)! This has been over a year and a half in the making. It feels weird that it's done. I did the finishing as I went, so all that's left is to sew in the sleeves and sew on the buttons (I blocked the sleeves last week, but the rest of it has been sitting in vest form for quite a while).

I haven't fully appreciated the occasion yet. I am a little dazed. :) I took a detail picture of the sleeves the day I finished to commemorate the big day, but I can't wait until I can try the whole thing on!

Saturday, November 20, 2010

Finished: Honey Cowl and Toasty

After the Peaks Island Hood disaster, I cast on right away for another one but my heart just wasn't in it. I got a few inches past the first shell pattern and just realized I was only knitting it because I felt I had to conquer it, not because I loved it. And lets face it, that's not a good reason to begin a relationship. I wasn't enjoying myself, either, and I also decided that the dark brown yarn I was using didn't show off the stitch pattern's texture to its best advantage.

So, I cut that project loose and cast on for a second Honey Cowl. My first one [Ravelry project page link] ended up belonging to my daughter, and I've been craving a nice squishy cowl to wear on evening walks so I decided to try again. Just in case anyone wants to use this pattern, it's free from the Madeleinetosh website [pattern link]. It's really a simple, straightforward pattern and gives such a quick result! I used single ply worsted merino wool from 100purewool.com, in the colorway Brown Lilac. It was really perfect for the pattern--the subtle color variation was played up by the slip stitch pattern.


I've seen many beautiful versions on Ravelry in Malabrigo and Madeleinetosh yarns as well. A semi-solid gives the most beautiful result, in my opinion! Anyway, I cast on for the largest size (it's wrapped twice around my neck in these photos), but I only knit about 8 inches instead of the 12 inches called for in the pattern--I used my nifty yarn scale to help me determine when I had approximately 50g left so I could make a matching pair of mitts.

I've enjoyed Leslie Friend's blog for a while (A Friend to Knit With) and I've had her Toasty [Pattern link] pattern in my queue forever, so it was fun to finally make them. I call them my hobo gloves, and they are so warm and snuggly!


The night I finished both of these projects, we went on a walk just before the kids' bedtime. There was just enough nip in the air from the marine layer that rolls in overnight, even 20 minutes from the beach where I live, that I was really glad for my new woolly accessories! (I've really got to teach my husband how to take knitting pictures...the one-armed look is getting repetitive, isn't it?)

Friday, November 19, 2010

Meet a friend of mine...

I don't have my latest finished object pictures uploaded yet, but I thought I would post today to give a little shout out to my friend "jmama" who writes one of my favorite blogs: Me Teach Kinder All Day.

If you have a Kindergartner in your life, you will love this. Jmama is one of the wittiest, most intelligent people I know, and she spends her days teaching the littlest of students. Her blog chronicles her year as a Kindergarten teacher, day by day. If you need a chuckle today, do yourself a favor and grab a cup of coffee or your favorite adult beverage, and start with Day One.

Saturday, November 13, 2010

Short Row Happy Dance

I have figured out why one side of my short rows look wonky all the time!! And it turns out I could have corrected this problem months ago by simply re-reading the directions in the glossary of any number of the knitting books on my shelf.

The problem was...drumroll...I inserted the needle from front to back instead of back to front when hiding the wrap on the purl side.

AFTER I figured this out on my own by fiddling with my knitting for an hour, out of pure spite I looked up the little short row instructions at the back of Interweave Knits, Spring 2009 that I had used to learn how to do purl-side short rows just to say "Ha! You told me how to do it WRONG!!" and I found this little gem: "Purl stitch: On wrong side, work to just before wrapped stitch. Insert needle from back, under wrap from bottom up, and put on left needle. Purl them together" (p.108). *Blush*

So, all is right in the world. Interweave Knits knows what it's talking about, I know how to do the purl side short rows now, and I'm almost done with my Delancey Cardigan (this short row revelation happened while knitting the second sleeve cap).

Incidentally, this brought up an interesting knitting question. I am not a frogger. I know that the first three short rows on the second sleeve aren't perfect, and I also know that the entire back side of the short rows on the first sleeve aren't perfect, but this does not bother me one iota. I always read Ravelry notes about ripping back sleeve caps or shawl collars or cable sections three, four, or five times to get it right...and I always think "Why?" Fellow knitters, do you keep ripping until it's perfect, or just figure it's good enough?

PS I almost entitled this post "I'm still alive!" because I have noticed that any knitting blogger worth her salt has at least one post with that title. *giggle* Anyway, I am still alive and knitting, and although I've been busier than usual lately I do have some things that are just about ready to share!

Post PS I've started again with the DVD sets of Buffy the Vampire Slayer while knitting in the evenings. Bring on the witty banter and handsome, non-sparkly vampires!

Tuesday, October 19, 2010

Finished, I guess: Peak's Island Hood

Well, I did it. I dyed my Peak's Island Hood. And it was a complete failure as far as a wearable finished object goes, but it was a heck of a lot of fun! I will let the pictures tell the story...

Oh bummer! I used two different colors of yarn (Patons Classic Wool Winter White on the left, Aran on the right).


Hmmmm...they are both cream colored, so I will just dye the whole thing once I am done and have a beautiful Peak's Island Hood to wear this winter.


Break out the Wilton's food dyes I have been hoarding! I want a nice deep teal, so I used Teal and a bit of Moss Green to tone down the brightness.


Play mad scientist while cooking dinner on the stove just to the right of this little scene. Hey, they are food safe dyes.


Let it cook in the crock pot all evening while I have a lovely chat with one of my dearest friends who joined us for dinner (homemade chicken noodle soup, perfect for this blustery October day). It eventually exhausted all that dye, if you can believe it.


Pull it out, rinse and blot dry. Great color. (It's actually quite a bit more blue than it appears here...late night light doesn't help with photographing this color!)


Um. I still have a two-toned scarf.


So, what have I learned? Paton's Classic Wool in Winter White is muuuuuuch better for taking dye than the Aran color (the Aran was very blotchy and took up much more of the dye than the Winter White did). And dye-ing yarn in the crock pot is a very pleasant way to spend an evening.

Also, I've started another Peak's Island Hood, this time with two matching skeins of already-dyed yarn. :)

Let there be color!

Don't you hate it when life gets in the way of your knitting? I sure do. Between school, work, colds, things breaking in my house, and fall fun activities like a trip to the apple orchards, I have had to stay up into the wee hours of the night if I want to spend time on my hobby...then pay for it dearly the next day when the kids are up at 6:30 am and want to come crawl in bed with me. It's adorable, but of course I can't go back to sleep. I always have to remind myself that they won't be little forever, and just squeeze them a little tighter until I am happy to be awake.

Despite the lack of knitting time, I have:
  • made a very little progress on my Delancey Cardigan. WIP photo here.
  • nearly finished a Peak's Island Hood by Ysolda Teague (Ravelry pattern page.). In a wonderful bonehead move, last year I purchased one skein of Patons Classic Wool in Aran, and one in Winter White, but didn't notice the difference until I was three inches past the skein change in my Hood. Argh. Silver lining: There will be Wilton's food coloring crock pot dye-ing to write about!
  • knitted about 4 inches of the intarsia part of the Weekend Getaway Satchel (Pattern photo below from Interweave Knits, Fall 2005) .


So, leave it to me to choose a huge, involved piece for my first intarsia project! I had to giggle at myself when I started the first row and realized that although there are only 3-5 spots of color in each row, the black background in between also requires a separate ball of yarn. I had to wind about 6 balls of black as I progressed across that row! I think at this point, I am up to about 12 little bobbins at once. This picture was taken about 10 rows ago, and there are also some red and yellow patches involved now. It just tickles me to see all the colorful little bobbins of Knit Picks Wool of the Andes hanging off the back of the work.


This bag is a labor of love. It's not TV watching or social knitting now that the solid pieces are all done. I've even felted them already! As soon as I get some good pictures I have lots to share.

Wednesday, September 29, 2010

Finished: City Cape with Bonus WIP Photo!

Since I've been working on so many things at once it's been a little harder than usual to see progress, but I finally have something that looks like a cape and a cardigan!


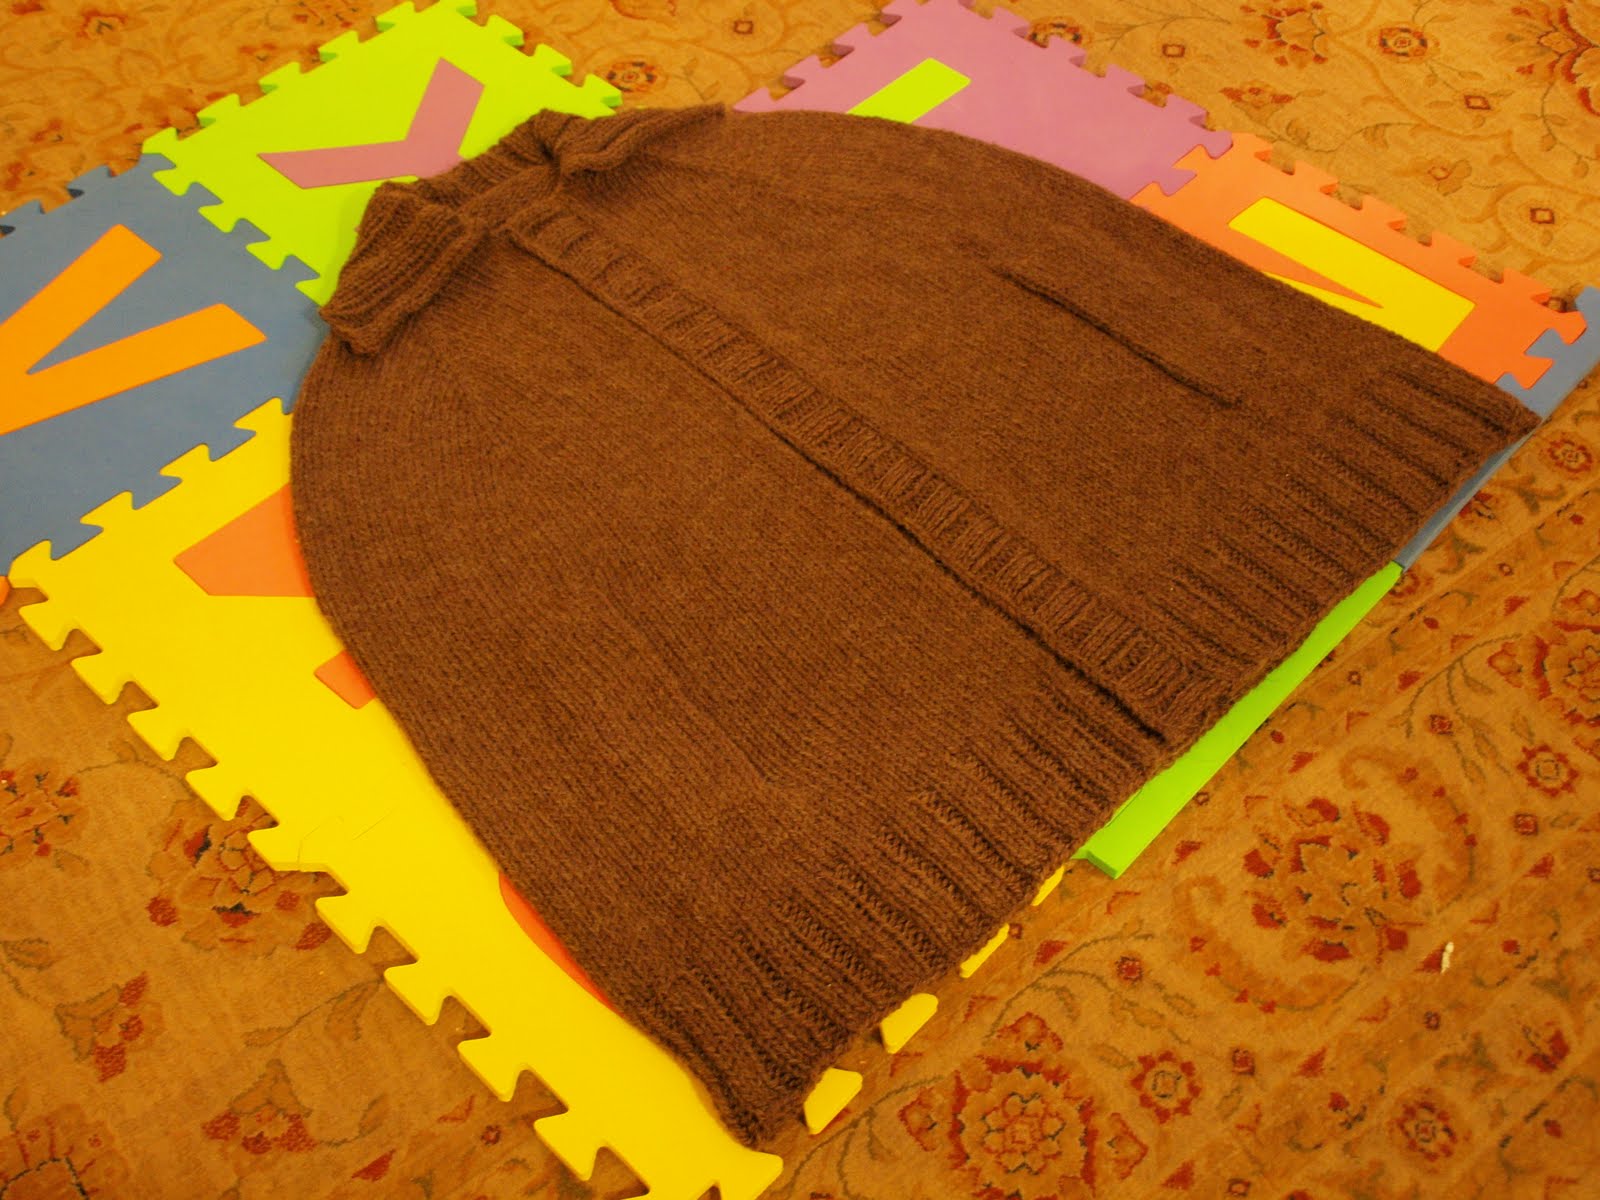
I am pretty much done with the Not-a-Poncho City Cape, from the book Custom Knits by Wendy Bernard. I used Cascade Ecological Wool in color #8087, Coffee. It's a top-down, raglan shaped cape. It took me a little under two skeins, and I added several inches before beginning the arm holes, otherwise the armholes would have started half-way up my biceps. My only other modification was changing the trim to 3 x 2 rib instead of 2 x 2. This is one of the things I really wanted for my Fall/Winter wardrobe, so I'm happy it's done before the weather changes.


I don't know if the news has traveled out of Southern California, but we've been having record heat around here (113 degrees in downtown Los Angeles and at least that hot where I live!) so I just couldn't face stepping outside to model my wooly cape. It's pretty much done, but it's supposed to have ribbon facing on the front bands and around the armholes. I bought some brown and cream with blue accents paisley ribbon at Joann, but it's not exactly what I had in mind--so I might just leave it off until I find the right one. I wanted something a little more earthy, and less of a contrast with the knitted part.

I do like the Cascade Ecological Wool, if only because it's so cheap. I bought five skeins of this stuff on sale at WEBS for $11 a huge skein of heavy worsted/bulky weight yarn (depending on who you ask), and so for $55 I have knit my husband a sweater, this cape, and still have enough left for a short sleeved cardigan for me. This color is a little hairy, but I have a lighter color that isn't quite as bad. From now on I think I will stick to the lighter colors.

Just for fun, here is one of my WIP's, the Delancey Cardigan designed by Alexis Winslow. Delancey is a one-armed lady at the moment...but I love knitting with Knit Picks Swish DK, so I don't even dread the sleeves. The other one will be coming right up! I'm using Beach Glass as the main color, and Pampas Heather as the contrast color. It's a little less punchy than the pattern model, but I was good and used stash yarn.


This is such a well-written pattern, and for once it's designed for taller-than-average girls with long arms! I actually knitted my sleeves SHORTER than the model. Never happened before! I really like the way it's written, with row numbers given in all instructions. It would be difficult to modify the length without completely re-writing the pattern, though, so keep that in mind if you're considering this one. This will hit me around the bottom of my rear, and I am 5'7" tall. Once I get the bottom trim knitted on, it will not have that "V" shape anymore.